Manage Notifications in the Brinks Home Mobile App
Summary
Brinks Home™ lets you enable, disable, and customize notifications using either the Mobile App or the Desktop App. This guide provides step-by-step instructions for both.
Table of Contents
Brinks Home™ Mobile App
Enable notifications
- Log in to the Brinks Home Mobile App and open the menu in the bottom right corner.
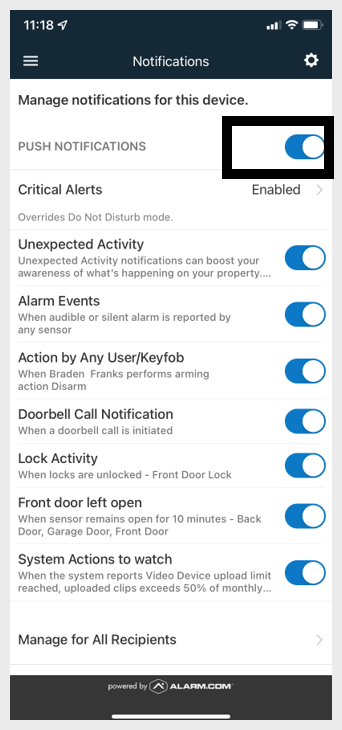
- Scroll down to Notifications. Menu options may vary based on your system.
- Toggle Push Notifications on to enable alerts.
- If prompted, allow Brinks Home to send notifications in your device settings.


Disable notifications
- Log in to the Brinks Home Mobile App and open the menu in the bottom right corner.
- Scroll down to Notifications.
- Toggle Push Notifications off to disable alerts.


Customize app, text, or email alerts
- Log in to the Brinks Home Mobile App and open the menu in the bottom right corner.
- Scroll down to Notifications and tap Manage for All Recipients.
- Select the notification rule you want to customize, then choose which devices and recipients should receive it.
- To change alert details, tap the rule, adjust settings, then tap Save.
- Tap Add to open your address book, select contacts, then tap Save.
- To edit system alerts, toggle each event on or off, adjust timeframe and recipients, then tap Save.


Brinks Home™ Desktop App
Enable notifications
- Log in to the Brinks Home App, then click Notifications.
- Turn on each notification type by moving the toggle right. To customize device alerts, select Push Notifications.
- On the Push Devices tab, select a device and toggle its notifications on.
- Toggle the switch to enable notifications for that device.


Disable notifications
- Log in to the Brinks Home App, then click Notifications.
- Turn off each notification type by moving the toggle left.
- On the Push Devices tab, select a device to change its settings.
- Toggle off to disable notifications or delete the device.


Customize text or email alerts
- Log in to the Brinks Home App, then click Notifications.
- Click the edit (pen) icon next to any notification rule.
- Click Add + to add or modify contact methods.
- Select contacts in the address book, then click Save.


Need Help?
If you experience any issues managing notifications, contact Brinks Home Customer Support for assistance.